
Instructables

ADJUSTABLE PCB VICE
Simple easy to build printed-circuit-vice has been featured on instructables
ADJUSTABLE-PCB-VICE
Download the .pdf file
Simple easy to build printed-circuit-vice has been featured on instructables
ADJUSTABLE-PCB-VICE
Download the .pdf file
MAKE CUSTOM INSTRUMENT LABELS
Use a laser printer to create custom labels for your electronic projects
MAKE-CUSTOM-INSTRUMENT-LABELS
Download the .pdf file.
Use a laser printer to create custom labels for your electronic projects
MAKE-CUSTOM-INSTRUMENT-LABELS
Download the .pdf file.
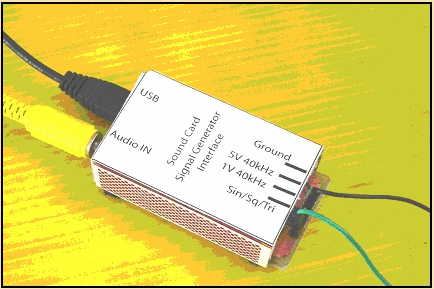
PC SOUND-CARD SCOPE INTERFACE FACILITATES DC RESTORATION
A simple interface circuit to the fantastic Sound-card Oscilloscope & signal generator software provided by 'Christian Zeitnitz' his website.
This submission has been featured on instructables
PC-SOUND-CARD-SCOPE-INTERFACE-FACILITATES-DC-RESTORATION
Download the .pdf file.
A simple interface circuit to the fantastic Sound-card Oscilloscope & signal generator software provided by 'Christian Zeitnitz' his website.
This submission has been featured on instructables
PC-SOUND-CARD-SCOPE-INTERFACE-FACILITATES-DC-RESTORATION
Download the .pdf file.
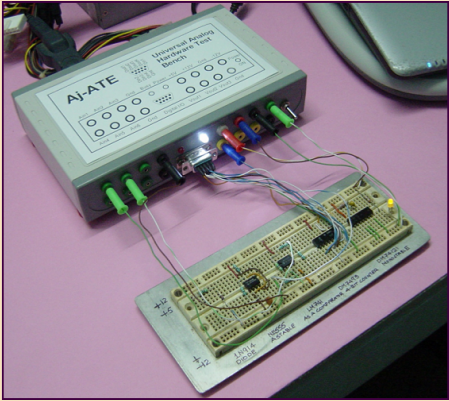
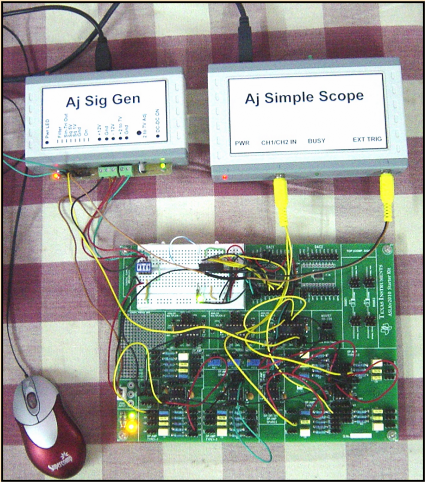
UNIVERSAL ANALOG HARDWARE TEST BENCH
A $35 TEACHING AID FOR BASIC ELECTRONICS, AND AN INVALUABLE EXPERIMENTAL SETUP FOR THE ELECTRONICS HOBBYIST.
Download the .pdf file.
A $35 TEACHING AID FOR BASIC ELECTRONICS, AND AN INVALUABLE EXPERIMENTAL SETUP FOR THE ELECTRONICS HOBBYIST.
Download the .pdf file.
ANALOG ELECTRONICS ANYWHERE
Analog Experiments Anywhere Two DIY micro-controller based USB connected electronic units which along with the Texas Instruments Analog System Lab Starter kit and a laptop permit you to conduct analog experiments anywhere.

DIY - USB OSCILLOSCOPE IN A MATCHBOX
I present a "BEST OF CLASS", "Full-Featured" DIY-USB OSCILLOSCOPE which is "Truly DIY".
My aim is to provide a cheap Digital-Storage-Oscilloscope for Students, Budding Engineers and the Hobbyist.
This USB-Oscilloscope could be part of the laboratory equipment in educational establishments.
PC SOUND-CARD SIGNAL GENERATOR INTERFACE
The Aj_SoundGen_SigGen unit is connected to the PC audio output and draws power through an USB connector. This unit overcomes the basic limitations of AC coupling and ±2V signal level limit of the audio output and implements a simple circuit providing a fixed gain and a variable offset of typically ±5V at the signal generator output.
The Aj_SoundGen_SigGen unit is connected to the PC audio output and draws power through an USB connector. This unit overcomes the basic limitations of AC coupling and ±2V signal level limit of the audio output and implements a simple circuit providing a fixed gain and a variable offset of typically ±5V at the signal generator output.
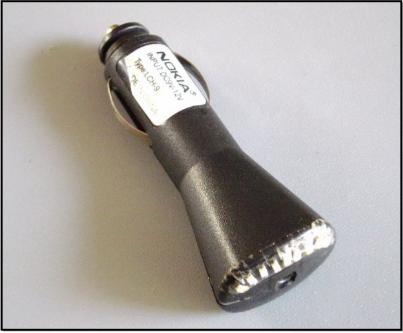
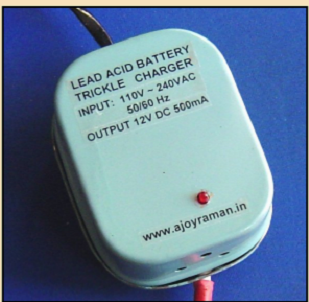
COMPACT-CAR-BATTERY-TESTER-ANALYZER-INDICATOR
A simple device which monitors the health of a car 12V battery and the charging system.
Based on the Texas Instruments LM3914 LED Dot-Indicator integrated circuit. The circuitry is housed within a defective car mobile charger case and needs only to be plugged into the car cigarette lighter socket.
A unique feature of this device is the provision of a socket which connects to the battery through a fuse permitting trickle charging of the car battery while monitoring the charging voltage..
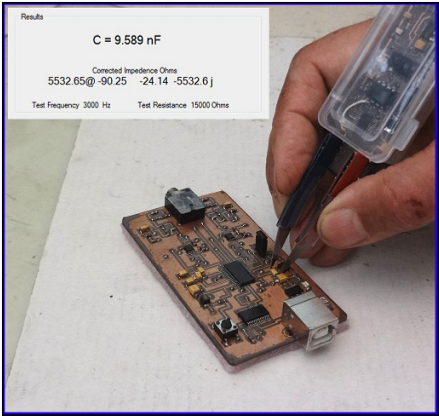
USB connected TI TMS320F28027 based ZRLC Tweezers with
Most Digital multi-meters measure Resistance and Capacitance and LC-meters can measure Inductance and Capacitance. Presented here is a ZRLC meter which can measure Resistance, Capacitance, Inductance and Complex Impedance.
The hardware is built around a TMS320F28027 micro-controller an 8-port-analog-switch ADG714 from analog-devices and a Microchip rail-to-rail dual operational-amplifier MCP6022.
The hardware details, .Hex file for the TMS320F28027 micro-controller and the VS2013 .Net 2.0 files for the PC GUI are provided in this Instructable.
The Source-Code ( TI CCS5.5 C-Code and VS2013 VB.Net-Code) is shared at the GitHub repository: https://github.com/ajoyraman/Aj_ZRLC_Tweezers .
A manual Impedance mode permits experiments and teaching of magnitude, phase and complex impedance concepts.
This hardware will form an invaluable tool for electronics students and hobbyists working with SMD components
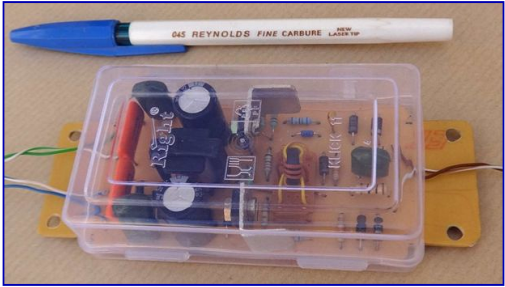
ELECTRONIC-BALLAST
This Compact, lightweight, high-frequency electronic ballast is designed to operate off the 230V AC mains supply at 50-60 Hz and is suitable for 36 - 40 W fluorescent tubes.
The advantages of such a ballast are:
Saving in Energy
Longevity of tube
Low noise
Operates at low voltages
No Flickering
No heat
Instant-Start operation
Minimal Weight
No Starter Required
The detailed technicalmanual can be downloaded from:
Aj-Choke_Tech-Manual_A4.pdf
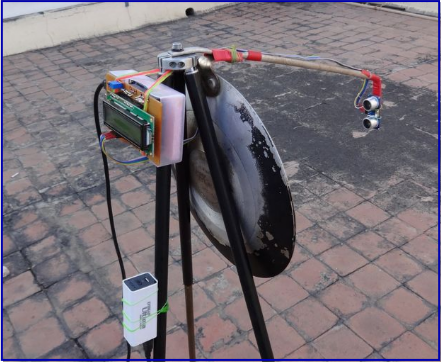
Long Range Ultrasonic Distance Sensor
This Instructable demonstrates a method of increasing the measuring range of the popular HC-SR04 ultrasonic distance sensor.
The enhancement in range is based on reducing the 'field of view' (FOV) of the basic sensor by using it as a feed element for a parabolic dish.
No changes have been made in the electronics of the basic HC-SR04 sensor. However, a blanking circuit has been added externally so as to ignore the first reflection/distance from the feed element to the parabolic dish.
The HC-SR04 is connected to an Arduino uno which displays the measured distance on a standard PC1602 16X2 LCD display. The distance is also sent on the serial link through the USB connector.
For outdoor experiments the system was powered through the USB connector using mobile power bank.
A maximum distance of 9.24 meters was achieved in the experimentation as compared to the 4 meters specified for the basic sensor.
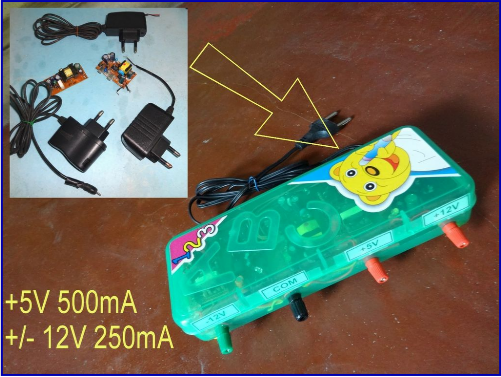
Pencil Box Triple Output Power Supply
Re-purpose your old mobile phone chargers into a triple output power supply for bread-boarding analog and digital circuits.
Mobile phone chargers which connect to the utility wall outlet are efficient switch-mode-power-supplies which convert the utility 110V/220V AC supply to 5V/6V DC with current ratings from 250mA to 1A and provide isolation from the AC mails.
Five chargers when suitably connected can form an excellent triple output power supply for bread-boarding analog and digital circuits.
Specifications:
Input AC 110V-240V 50/60Hz
Output 1 +5V DC 500mA Suitable for Digital IC's
Output 2 +12V DC 250mA Suitable for Analog IC's
Output 3 -12V DC 250mA Suitable for Analog IC's
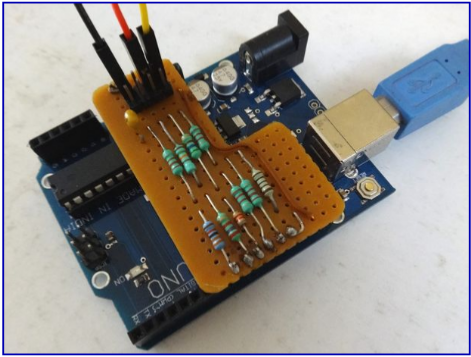
10 Resistor Arduino Waveform Generator
If you have an Arduino UNO this project is practically free!
It also makes a great Arduino Nano project.
What you need (only passive components):
If you have an Arduino UNO this project is practically free!
It also makes a great Arduino Nano project.
What you need (only passive components):
- Just 10 Resistors
- One filter capacitor
- A Direct Digital Synthesis (DDS) Waveform Generator
- True 50 kHz Sin-Wave capability
- Sin, Triangle, Ramp Up ,Ramp Down outputs
- And Arbitrary Waveform Generation (AWG)
- 50 kHz seen on an Analog Oscilloscope
- Arbitrary waveform created using a sum of f and 2f
- The arbitrary waveform spectrum
- An a compact version implemented using an Arduino Nano
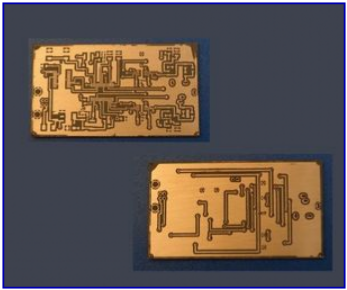
DIY Double-Sided Fine-Pitcb PCBs Youtube
Inability to fabricate double-sided fine-pitch printed circuit boards is a major constraint for students, engineers and Do-It-Yourself enthusiasts who want to work with Surface-Mounted-Device (SMD) devices and build only one or two prototype PCB's for their projects.
Over the years I have perfected a method of fabricating such PCB's at home using only the minimum of tools.
In this video I share my practical experience and present comprehensively all the steps in getting a double-sided PCB fabricated.
This PCB took me only 3-4 Hours to fabricate starting from the first laser print to the PCB ready for population of components.
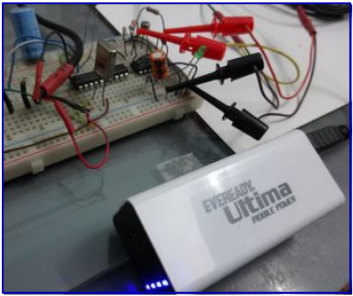
Using Mobile Power Banks to Power Electronic Circuits
Mobile Power Banks can be used as an excellent power source for simple electronic circuits and DIY projects. However, as they are designed primarily for charging mobile phones they possess certain inbuilt features which need to be suppressed.
Basically the power bank shuts down if the output current drops below a set threshold. To do this the internal circuitry continuously polls the output current over a period of 12-15 seconds and shuts down if the value is below a threshold. I present a simple way to overcome this.
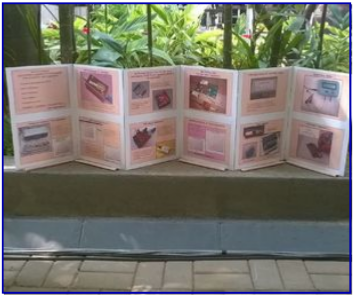
This is an easy to make 'Z Fold Display Standee' which is compact to carry and can alternatively be displayed on a flat surface using double-sided tape.
This Instructable has two novel features:
It reuses old scrap foam board material form discarded No-Parking/Advertisement signs
Presents a method of providing stability to the opened-out display by incorporating a method to weigh down the bottom edges.
This Instructable has two novel features:
It reuses old scrap foam board material form discarded No-Parking/Advertisement signs
Presents a method of providing stability to the opened-out display by incorporating a method to weigh down the bottom edges.
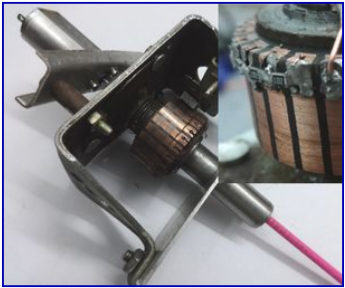
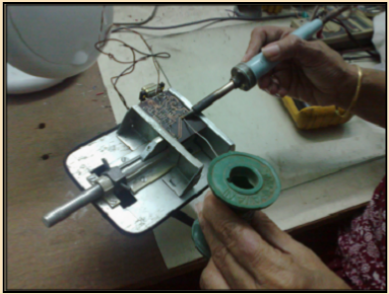
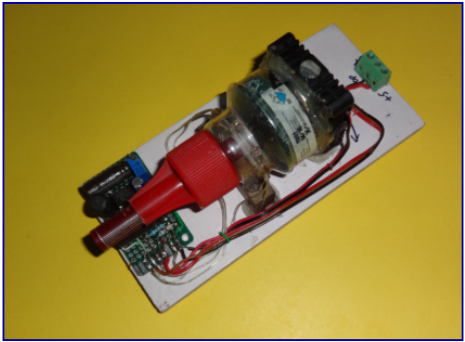
Commutator Based One-Wire potentiometer
This is a novel method of creating a one-wire potentiometer based on reuse of a small universal-motor commutator-brush assembly. This approach has the important advantage that the central core of the commutator-shaft can be hollow permitting an additional shaft to be co-axially located within this hollow core. However, because of the limited number of commutator segments it provides indication of only a fixed number of discrete angles.
This is a novel method of creating a one-wire potentiometer based on reuse of a small universal-motor commutator-brush assembly. This approach has the important advantage that the central core of the commutator-shaft can be hollow permitting an additional shaft to be co-axially located within this hollow core. However, because of the limited number of commutator segments it provides indication of only a fixed number of discrete angles.
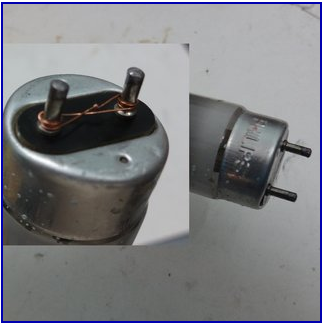
Extend Defective Fluorescent Tube-Light Life
I present here a non-standard scheme to extend the life of defective Fluorescent Tube-Lights.
I found that while fluorescent tubes were originally designed for wire-wound-ballasts which needed active filaments at both ends for their operation, electronic-ballasts are capable of operating with only one filament. In this mode the electronic-ballast is operated outside specified electrical limits but appears to have sufficient design margin for continuous operation.
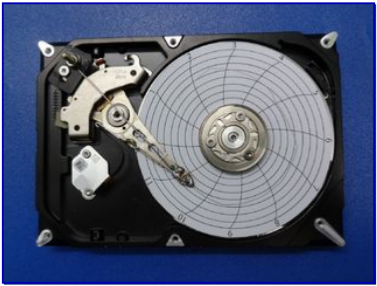
HDD Circular Chart Recorder
Several of the 'Environmental Test Chambers' which I have come across during the 'Stress Screening' of electronic subsystems were fitted with 'Circular Chart Recorders' which recorded process parameters such as temperature, humidity and pressure-altitude on a circular chart as a real time record of the overall test plan.
Recently my computer Hard Disk failed and I opened it up with a view to see if something could be made out of the basic parts.
This is an attempt to usemodify a computer hard Disk as a Circular Chart Recorder.
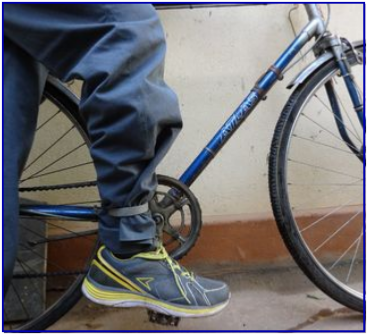
Cycling Trouser Clips
While cycling wearing trousers there is always the potential hazard of getting the bottoms stuck in the drive gear and chain assembly.
Protect yourself with a pair of 'Cycling Trouser Clips'!
A very simple pair of 'Trouser Clips' can be fashioned from plastic pipe fittings.
While cycling wearing trousers there is always the potential hazard of getting the bottoms stuck in the drive gear and chain assembly.
Protect yourself with a pair of 'Cycling Trouser Clips'!
A very simple pair of 'Trouser Clips' can be fashioned from plastic pipe fittings.

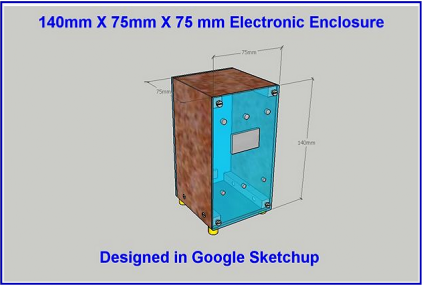
Simple DIY Electronic Enclosure
I share with a simple method of constructing DIY Electronic Enclosures based on a technique devised by my dad and me over 30 years ago.
This method is based on fastening the front and rear panels of the enclosure to four rectangular members at the four corners using machine screws.
In addition to drilling and cutting used with metallic enclosures this method involves the additional operation of tapping drilled holes.
The front and rear panels along with the four rectangular members forms the primary structure onto which other components can be fixed. We can choose the materials based on the size of the enclosure and the corresponding strength requirements. Larger enclosures with increased strength requirements would need additional horizontal members both front-to-back and side-to-side.


Arduino Uno DDS Audio Signal Generator
This is an update on my earlier Instructable: 10 Resistor Arduino Waveform Generator
https://www.instructables.com/id/10-Resister-Ardui...
It is motivated by comments from members AhmedS419 and BeenThereD where we discussed the possibility of creating a stand-alone mode without the need for commands from a USB connected PC and GUI.
In this Instructable I have modified the hardware and embedded software to provide both an independent stand-alone mode of operation, requiring only external power, and a PC connected GUI mode providing additional features. The project is now enclosed an a DIY Box.

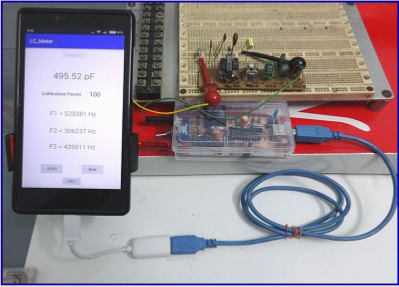
Android On-The-Go (OTG) LC-Meter
Presented here is a modified LC-Meter design based on a Microchip PIC18F14K50 USB Flash Microcontroller which is connected to an Android phone using the On-The-Go (OTG) mode. The phone provides power to the circuitry and an Android Application provides the Graphical-User-Interface (GUI).
FLUIDIC RATE SENSOR
Have you noticed that when you move a water hose from side-to-side the water jet lags the hose direction and aligns with it when the motion is stopped. Determining the angular deflection of the water jet at the output of the hose would provide a measure of the angular rate in this sideways direction.
This Instructable demonstrates this principle by constructing a 'Fluidic Rate Sensor' using 'Odds and Ends' available in my 'Home Lab'. The fluid here is 'Air'.

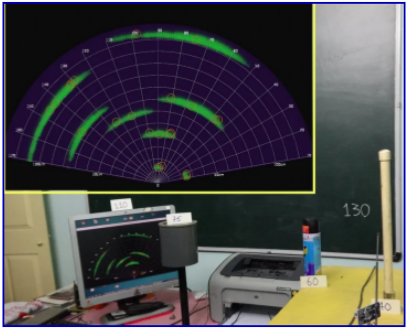
Arduino Analog Ultrasonic Radar
Standard digital outputs of the "HC-SR04" and "Grove Ultrasonic" sensors provide information only on the distance to the nearest target. By processing a signal derived from an intermediate point on the Seeed Studio Grove Ultrasonic Sensor it is possible to derive an "Analog Echo Signal" from targets.
This permits target echoes even from of targets behind each other to be displayed on a "Plan-Position-Indicator (PPI)" display.
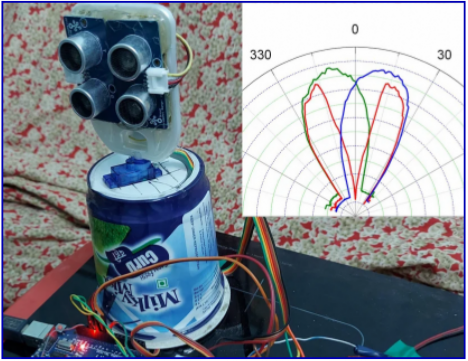
Ultrasonic Mono Pulse Tracker
This project demonstrates the functioning of an "Ultrasonic Mono-pulse Tracker" built using two Grove ultrasonic sensors.
The "Amplitude Comparison Mono Pulse" principle demonstrated here is based the amplitude signals derived from the overlapping beam patterns of the two sensors.
When we look at the difference in the amplitudes from the two beams we find a null when the tracker is pointed directly at the object being tracked. A error signal derived when the tracker is away from this direction is processed and fed as a rotation command to the servo-system to bring the track back to the desired position.